BELLY BREATHING
Belly breathing can be incorporated while doing most of the exercises instructed found on this page.
Belly breathing has lots of health values. In addition to activating the diaphragm, it mobilizes our organs and stimulates the Parasympathetic Nervous System (the part of our nervous system involved in resting, digesting, and healing).
Belly breathing can be challenging, especially if we have strongly developed a chest breathing pattern, frequently acquired as a result of injury, trauma, anxiety patterns, or societal conditioning associated with keeping the belly in tight all the time.
If allowing the belly to rise and fall as you breath while keeping the chest calm is challenging, a person can start at a very basic level.
Find yourself lying comfortably on your back or sitting upright and comfortable. Place a hand on your belly and another hand on your chest. With one hand, feel your belly rise on inhale and fall on exhale while the other hand observes your chest being still or calm as you belly breathe. As simple as this seems, it is challenging for many people. If this is challenging for you, be kind to yourself, let go of self-judgment and stick with it!.. It may take some practice.
Our “Core” stabilizes our spine, helps us with posture, and is the link between the upper and lower body. Core may include a lot of muscles; at a minimum, it is a cylinder that includes the diaphragm at the top. The transverse abdominus, multifidi, and rotatores muscles, as well as the thoracolumbar fascia create the sides of the cylinder. And then the pelvic floor is the bottom of that cylinder. Strengthening and bringing awareness to this cylinder has an abundance of positive health benefits.
CORE-ENGAGED BELLY BREATHING
The first step is to get yourself Belly Breathing. Once belly breathing is accomplished, we add core engagement around the exhale.
Inhale letting the belly expand, core engage as the belly falls on exhale.
As we core engage on exhale, we kind of hug our muscles around our low back, like a corset or one of those velcro-style back braces people put on when lifting throughout their workday. In this exercise, crunching the spine forward in a sit up motion is not the intention.
With that core engagement on exhale, if we are not lying down, we can add a bit of spine motion to this exercise; use the core engagement on exhale to get a little taller through the spine with each core engaged exhale.
So, as we inhale we allow the belly to relax and expand, then on exhale we core engage and make ourselves a bit longer and taller through our spine. It is kinda like we are using our core on exhale like a pump, making our spine a little longer and taller toward ideal posture with each exhale.
While practicing this, we can imagine our abdominal muscles as a pair of pants with a long zipper that goes from the pubic bone all the way up to the sternum. On exhale imagine zippering up that zipper during core engage exhale, bringing an awareness to the lowest abdominal muscles first and using that “zipper up” core engaged exhale to get taller through the spine on exhale.
If we can get those things tuned, we can then add pelvic floor muscle engagement on exhale, allowing relaxation though the pelvic floor and belly with expansion on inhale.
From this perspective, pelvic floor muscle engagement is not clenching off urine nor is it clenching the anus. The pelvic floor, as we are understanding it, is a sling of muscles that is experienced between the two areas of elimination. On exhale we create a gentle lift through the pelvic floor as we core engage and lengthen through the spine. On inhale we let it all relax. This may be an area that we do not have great sensory awareness of...do not stress over function here. Tips: For guys, pelvic floor engagement may feel like we are using inside muscles to lift the scrotum just a little bit. I am told that for women, it may feel like you are using inside muscles to pull a tampon up just a little bit.
The important thing is to start with belly breathing and add what you can that feels appropriate to you. Feel free to reach out to me, Dr. Blair, if you have questions or concerns.
DEEP NECK FLEXOR EXERCISE
On exhale perform a gentle crunch with head staying neutral, face remains straight toward ceiling. As you lower on inhale keep the head/face neutral making the neck as long as you can all the way down until the back of the head touches the floor (it may feel like you are slightly tucking the chin as you lower, making the back of the neck as long as possible). When the back of the head makes it to the floor, all the way relax for a full breath cycle out and in.
Do this exercise for 10 repetitions - lifting on the exhale, lowering and lengthening on inhale, and relaxing for a full breath cycle.
**10 may be too much for you right now, do as many as appropriate, stopping or reduce the intensity if you are trembling during this exercise.**
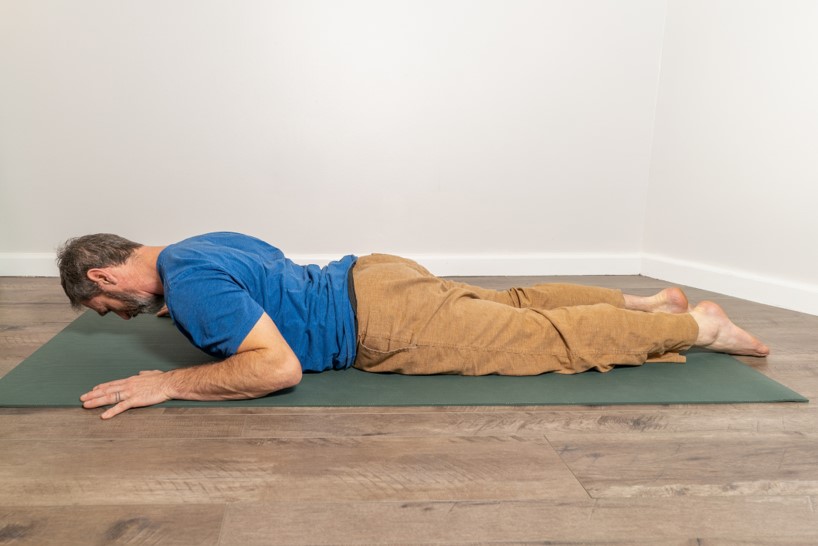
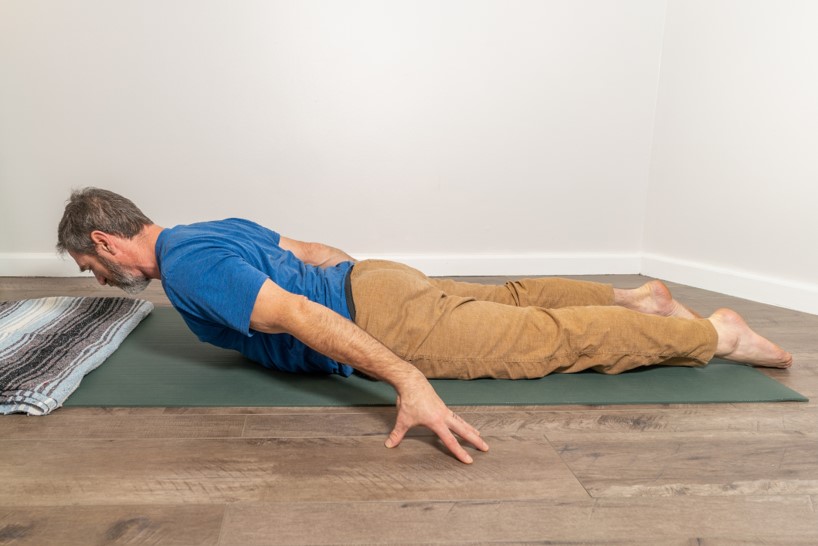
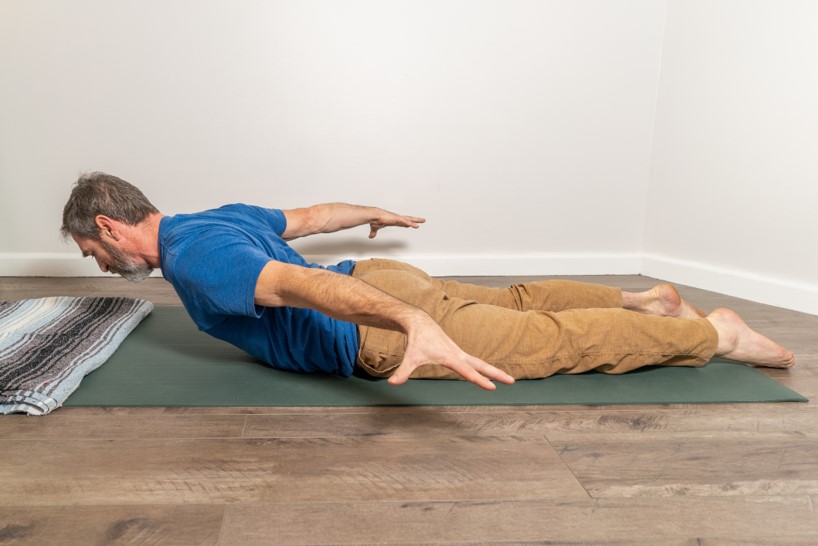
BELLY TIME EXERCISES
Belly time exercises are some of my most commonly recommended exercises...I recommend some version to most people.
These exercises can be done with a variety of intensities and variations. As with other exercises, we want to avoid pushing ourselves into pain or overdoing it (trembling during exercise). I like to encourage movement that follows breath. With this exercise we can attend to all four parts of breath (1. the inhale, 2. the pause with full lungs at the top of inhale, 3. the exhale, and 4. the pause with relatively empty lungs at the bottom of exhale)
The way I recommend starting with this exercise (this may be plenty for all of us without doing a more intense version) is to lie on your belly with arms and forearms relaxed on the floor.
-On inhale lift the head and maybe the chest off the floor keeping your head neutral with your spine. Like ideal posture. (classic yoga poses encourage us to look up and crowd the back of our neck in these positions...Please Avoid the look up, crowd the back of the neck addition).
-At the top of the inhale, while lifted, see if you can get a little longer through the neck, creating space and length between the shoulders and ears, like you are exaggerating ideal posture with the spine by just a little bit.
-Lower on exhale bringing an ear or cheek down to you mat or floor (you will switch the turn of the head as you bring your ear/cheek to the mat at the bottom of each exhale).
-At the bottom of exhale (that pause of no breath) when the ear or cheek is on the mat or floor, try to all-the-way relax. Maybe extend the length of time of this relaxed moment with no breath and take inventory of how you feel in the body. There are lots of opportunities here to notice subtle and maybe not so subtle experiences in the body.
-When you are ready to inhale, turn the head to neutral, nose pointing toward the mat, lift as you inhale repeating the cycle.
Please see examples below. Other variations may include lifting and lowering one or both legs as we lift and lower the upper body.
BRIDGE (WITH VARIATIONS)
Bridge pose exercises and variations can be applied while being mindful of our breathing.
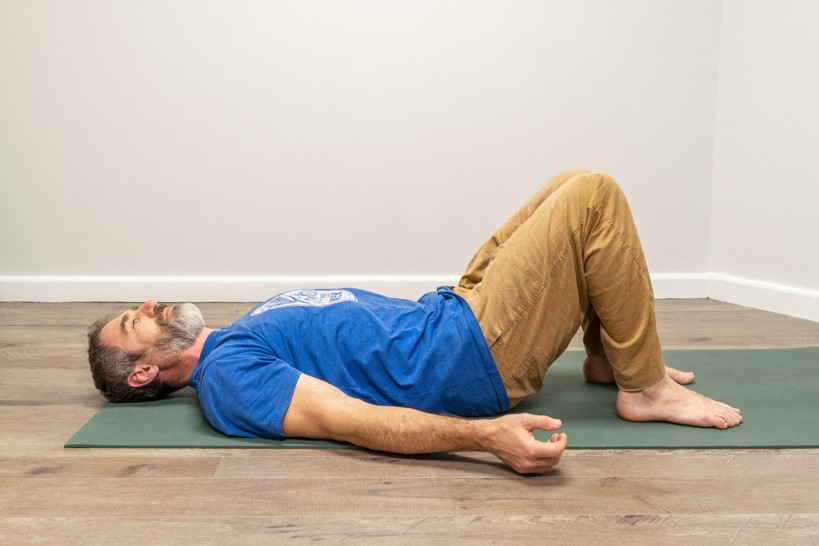
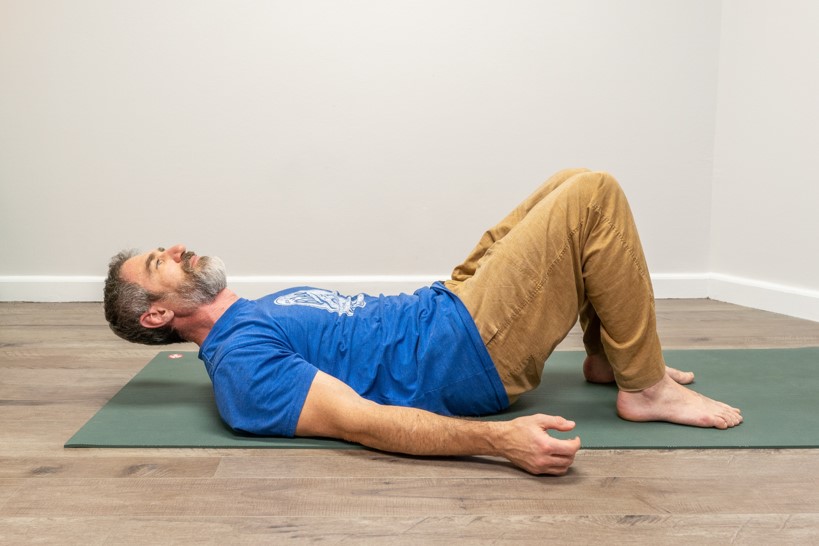
Starting position: While lying on your back with heels in close to our bottom, feet flat on the floor, and ankles about four inches apart, bring yourself to Belly Breathing.
You may notice, especially if you slide your hand under your low back that there is a little space between your low back and the floor in this position.
An easy, gentle variation on Bridge that is very beneficial, especially if you are in an episode of significant pain:
From starting position: While belly breathing with core engagement on exhale, push the low back gently down to the floor. As you inhale let your belly expend and allow your low back to return to neutral ( a little space between the low back and floor). Notice the little bit of pelvic tilt that happens. **This can remain very gently or you can add a bit of an intensity to the squeeze of the low back down if it feel safe for you in the moment.**
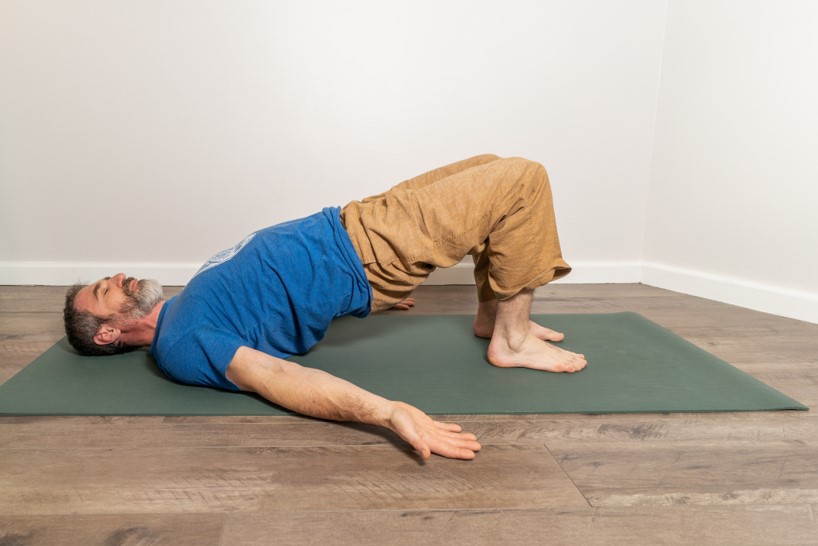
When you are ready to add more, from starting position, inhale and lift the hips into Bridge pose (belly expands toward ceiling on inhale). On exhale, core engage and lower the hips back to starting position. Try to keep knees over the ankles with a little bit of inner thigh muscle engagement as you inhale to lift and exhale to lower.
BUTTERFLY
Butterfly can be done with mindfulness toward core engaged belly breathing.
Start lying on your back, knees bent, heels in close to your bottom, feet flat on the floor, inside edges of your feet together.
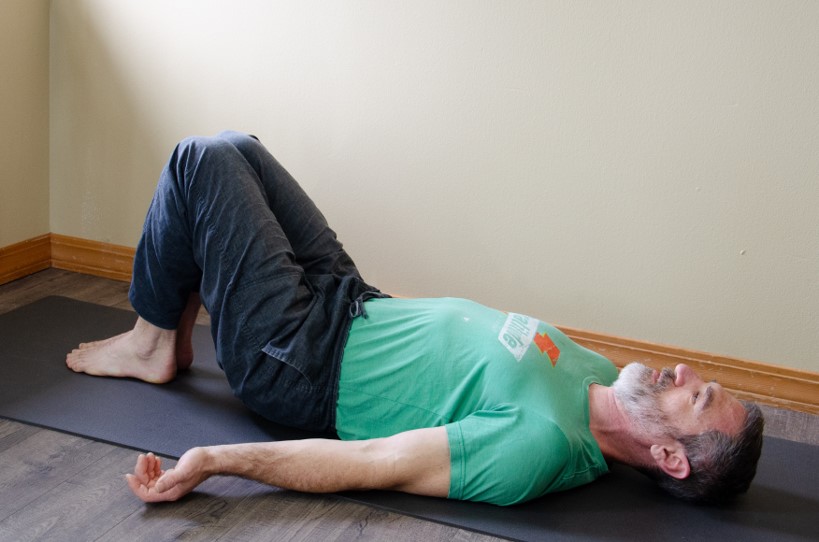
Exhale position with inner thighs squeezed together.
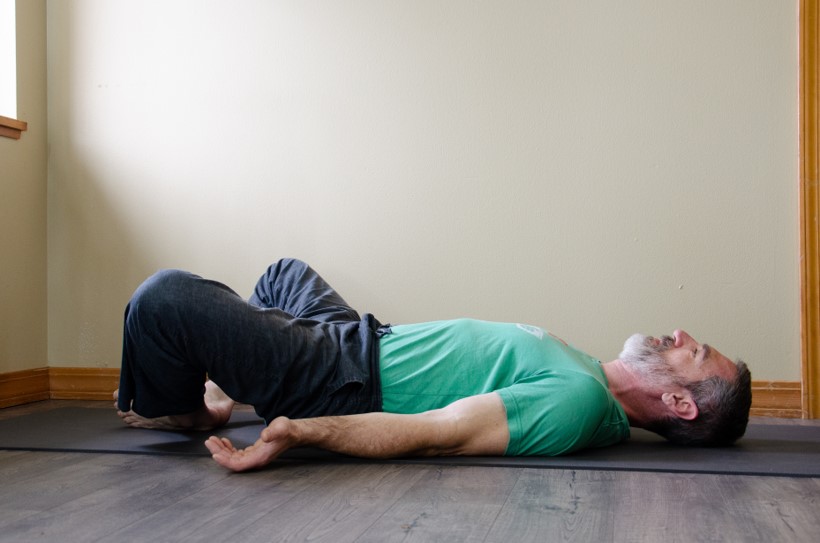
Allow the legs to open wide on inhale into the Butterfly position. Inside edges of the feet together, legs open to your end range of hip motion.
Inhale belly expands opening the legs into Butterfly.
Exhale core engage, squeeze legs together.
**Your hands can be on the outside of the thighs offering support to inner thigh muscles as you open and close your legs if this is a lot for the inner thigh muscles or low back.**
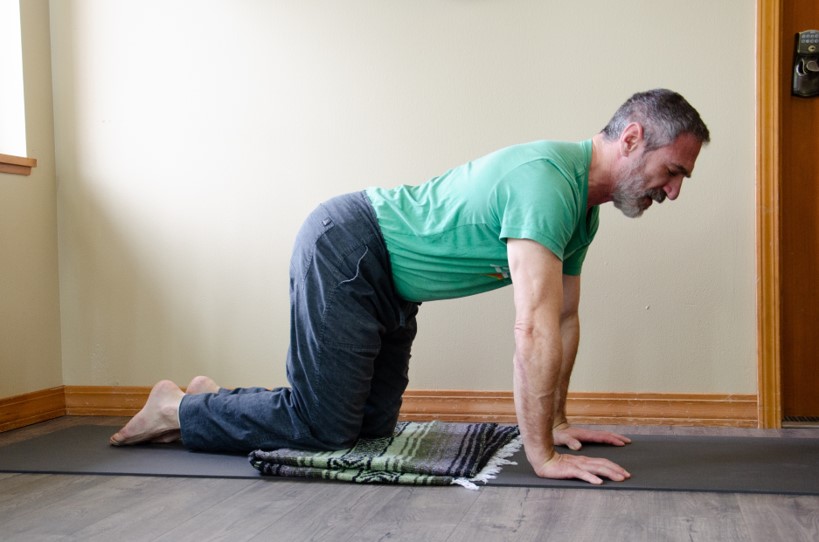
PELVIC TILT / CAT-COW
Core Engaged Belly Beathing with these stretches.
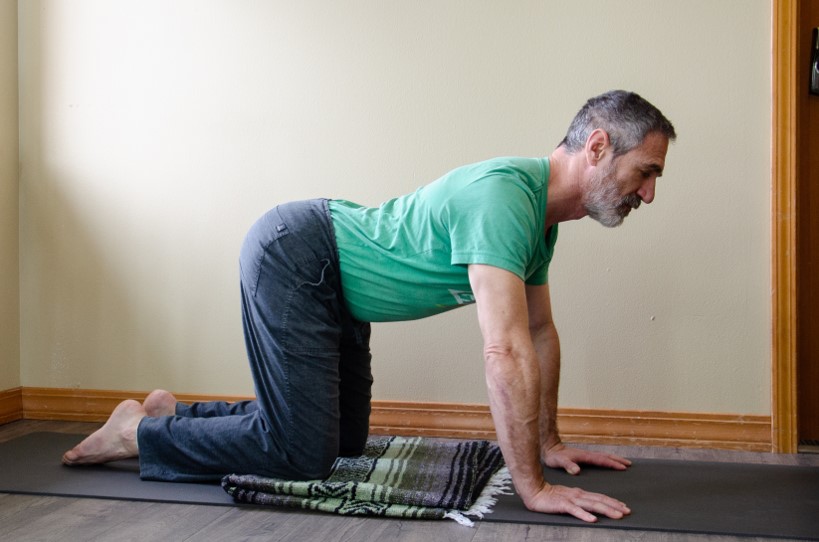
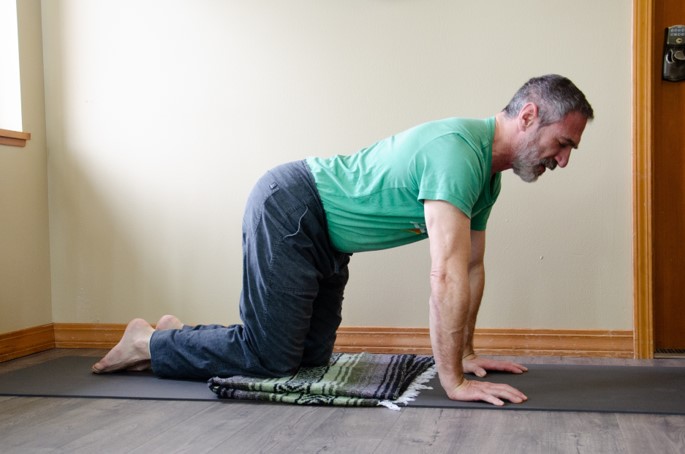
From the starting position, I like to invite people to start motion kind like cat and cow except for trying to explore just pelvic tilt for a few breaths keeping the rest of the spine neutral. Pelvic tilts: On Exhale, draw the belly in and gently tuck the tail and round just the very lowest part of your back. On Inhale, allow your belly to expand toward the floor and tilt your tail into the air.
When you are ready, expand motion into Cat and Cow motions.
Cat Pose: we fully round/flex through the spine on exhale, drawing in on the belly, tucking the tail and bringing chin toward chest.
Cow pose: we fully extend through the spine on inhale, belly toward floor, tail in the air, top of head lifts toward the ceiling.
**Classically in yoga, the Cow pose includes the instruction to look up toward the ceiling, fully extending or back bending the neck. This can often be uncomfortable and, truthfully, holds little value from a stretch and fascia perspective. Further, it can crowd the space where the head and neck meet contributing to headaches and discomfort. I recommend keeping the neck long and lifting the top of the head toward the ceiling in the back bend Cow position, avoiding the crowding back of the neck, base of the head area.**
PELVIC TILT / CAT-COW VARIATION
Low Back focused stretch Variations to Cat-Cow.
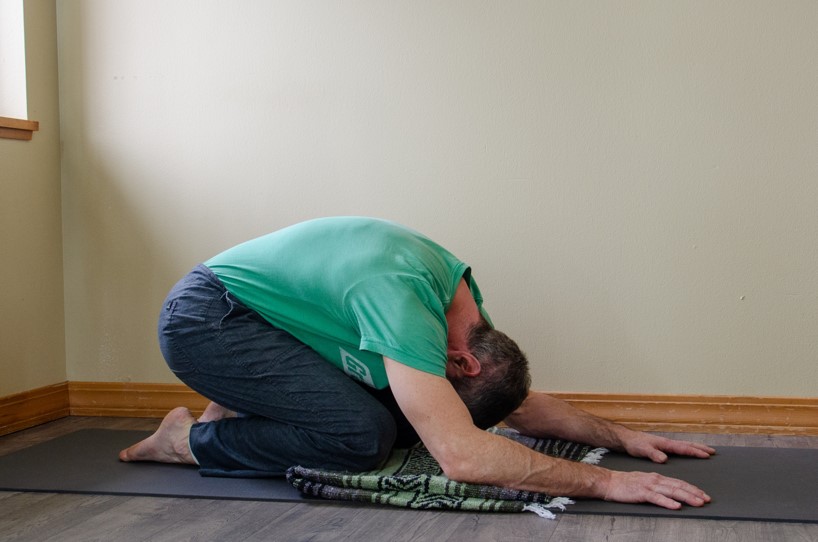
Continuing Core Engaged Belly Breathing through Cat-Cow type motion but include hip and knee motion to add a bit more stretch to the low back and pelvic area.
Continue breathing back and forth between these poses as desired to release tension. Please try to avoid forcing too much stretch into your body.
Another variation or addition to this variation is to do this with Staggered Knees. Bring one knee forward just 2-3 inches (5-6 inches is too much). Continue to exhale and round back, inhale and ease forward to cow for several breaths then switch the knee that is forward and repeat a similar number of times with that knee forward. After several breaths exploring staggered knee variations to this sequence of motion, bring the knees back to even underneath the hips and breath though this variation of stretch and motion with knees symmetrical, bringing an even stretch back into the body to complete this stretch variation.
SUNBIRD OR BIRDDOG
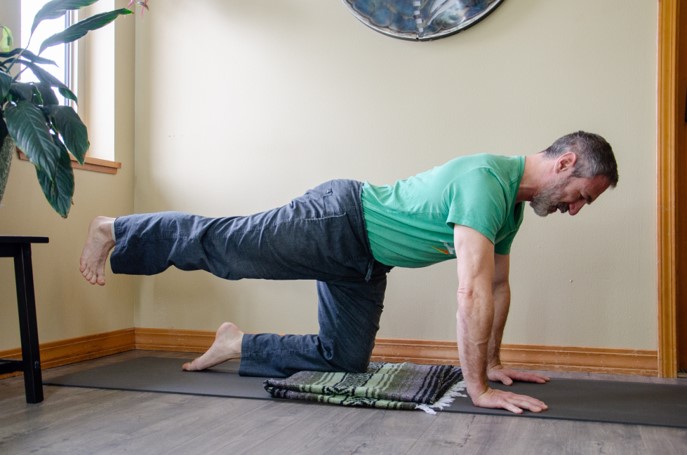
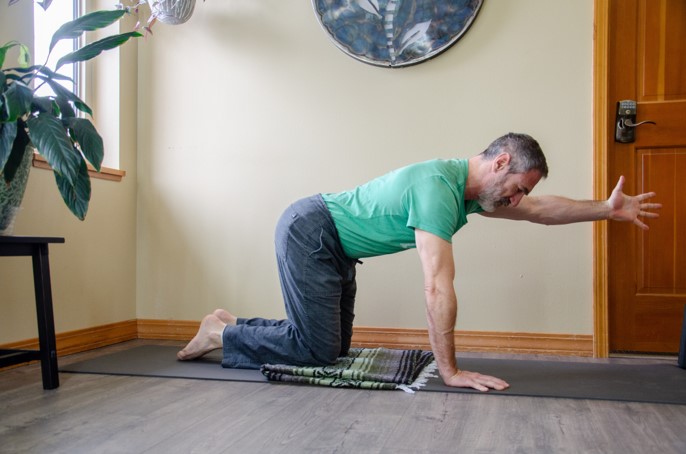
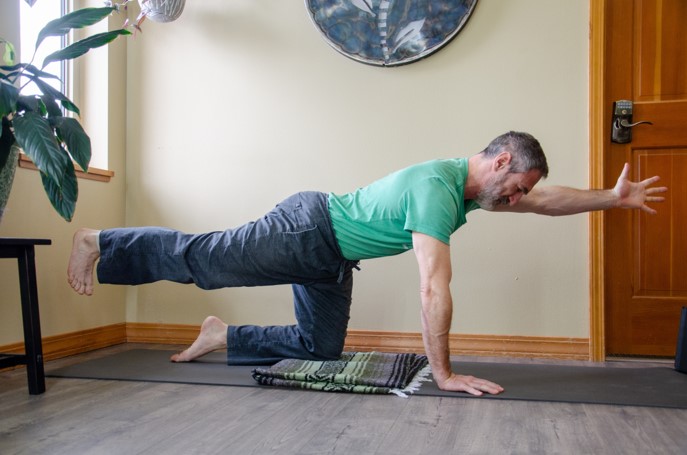
So, in yoga this pose is called Sunbird; in the physical therapy world folks like to call it Birddog….either way, it is a wonderful exercise for the body whether we use it to target gluteal muscles, hamstring muscles, the low back, the core, neck or shoulders. Variations on this exercise are abundant! I will start by describing gentle variations and continue describing with increasing intensity.
Following breath multiple times on each side. Do the other side an equal amount of times.
When lifting on inhale, see if you can be long from heel through top of the head. Keep the inner thigh muscles engaged as you lift and lower the leg so that all of the toes continue to point toward the floor, try to keep hips level. **Back off if you tremble or experience pain**
CACTUS ARM EXERCISES
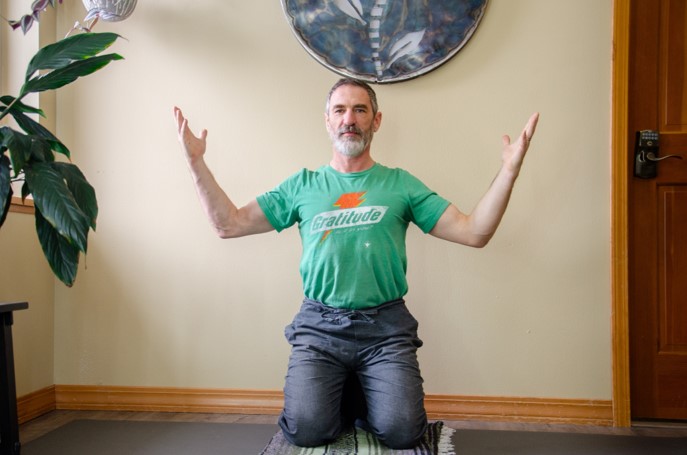
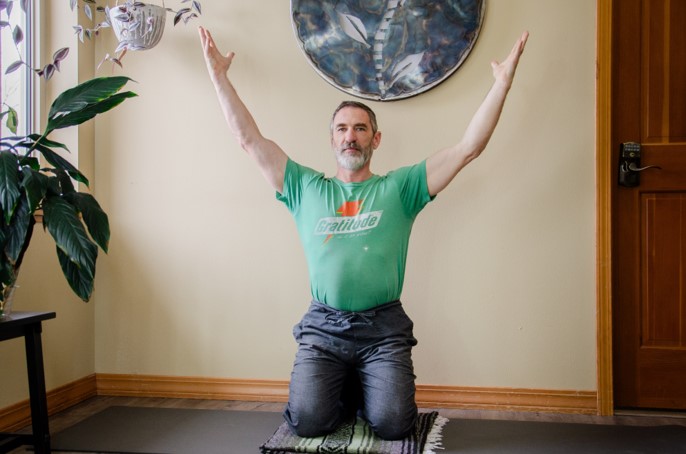
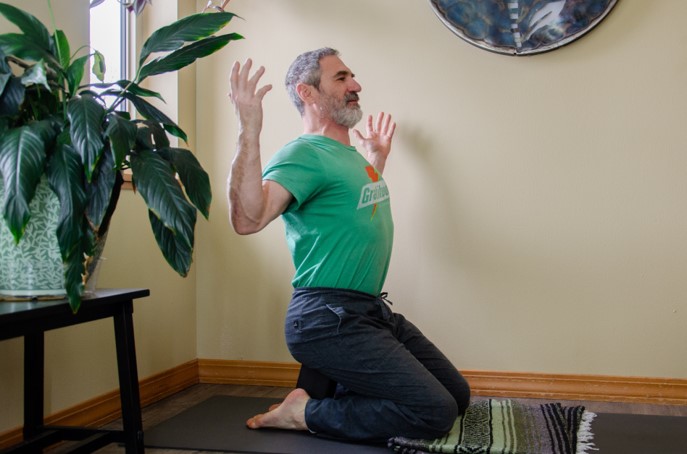
The Cactus Arms Exercise is intended to strengthen the lower trapezius muscles. The lower trapezius muscles are intimately involved in balancing neck, upper back, shoulder, and base of head muscle tension associated with poor posture.
It is important to apply Core Engaged Spine Lengthening Belly Breathing to the Cactus Arms Exercise. Using core to keep the spine long lengthened and upright helps to prevent us from dumping into unintended, poor spinal motion patterns during cactus arms….the squeeze of the shoulder blades onto the back can cause us to pop the sternum forward and up and can cause us to arch the mid and low back area. Please try to use breath and spine lengthening to prevent these motions.
HIP STRENGTHENING EXERCISES AND STRETCHES
Hip strengthening and stretching has many variations, but order of operations has value. It is best to do strengthening activities first, then relieve some of he pump, then stretch the muscles in the area.
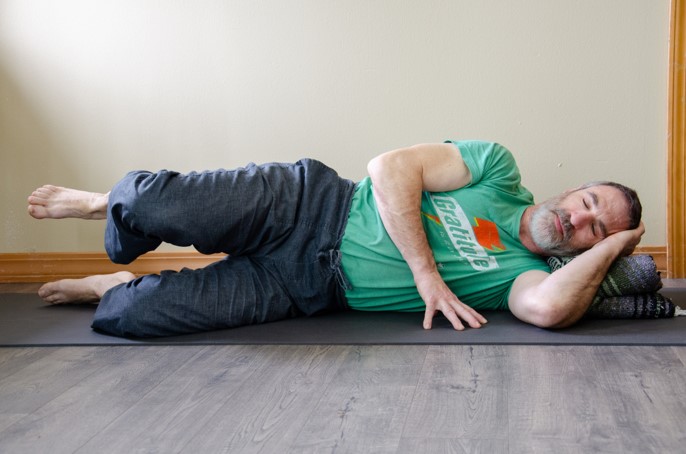
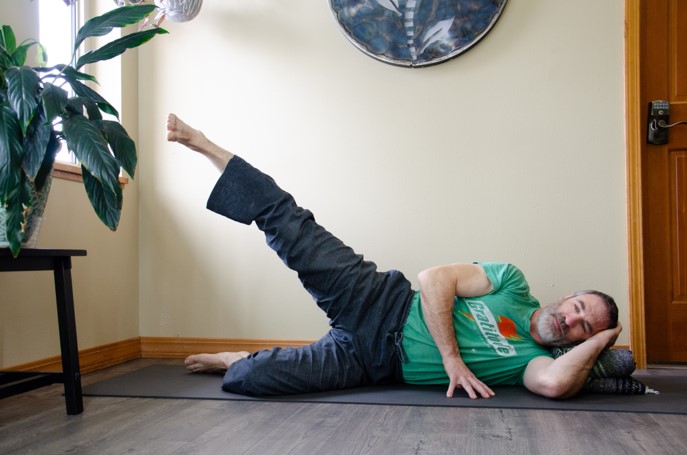
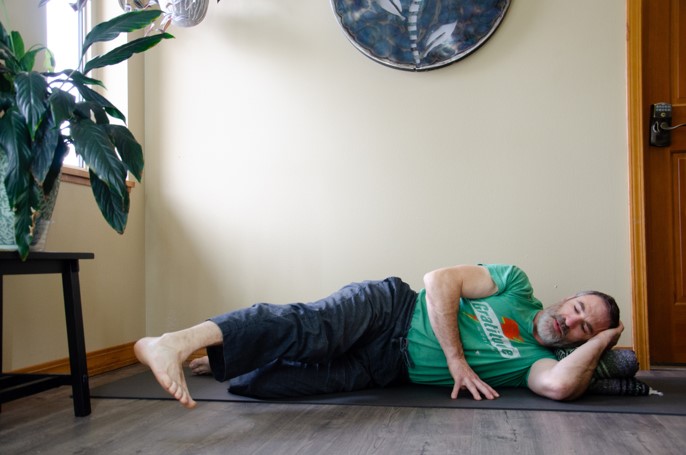
Strengthening Variations: clam shell, leg lifted knee circles, straight leg clock
HIP STRENGTHENING EXERCISE - STRAIGHT LEG CLOCK VARIATION
The straight leg clock variation is a somewhat intense hip strengthening exercise. Please do not overdo it, be kind to yourself, stop if you are trembling or in pain. Maybe start with only 1-3 repetitions in each position of the clock and build up from there.
I imagine that you will feel pumped and fatigued in the gluteal region after doing reps at 6, 5, 4, 3, and maybe 4, 5, and 6. Roll onto the other side and do the same exercise… we might say from 6, 7, 8, 9 and maybe back 8, 7,and 6 on that side. After these hip strengthening activities, I recommend releasing a bit of the hip / gluteal muscle tension or pump that you may be noticing before stretching.
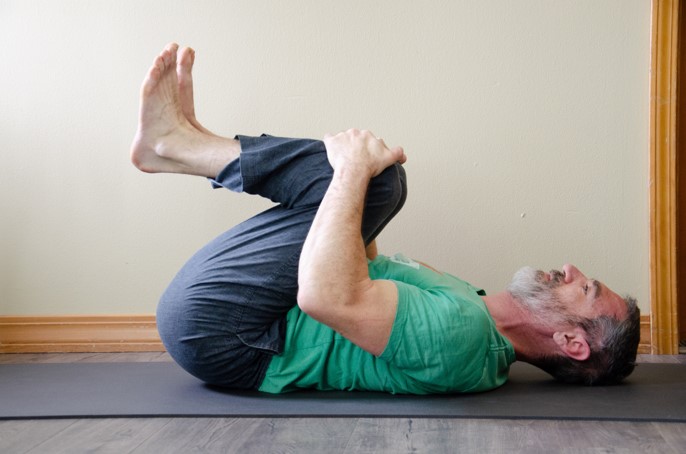
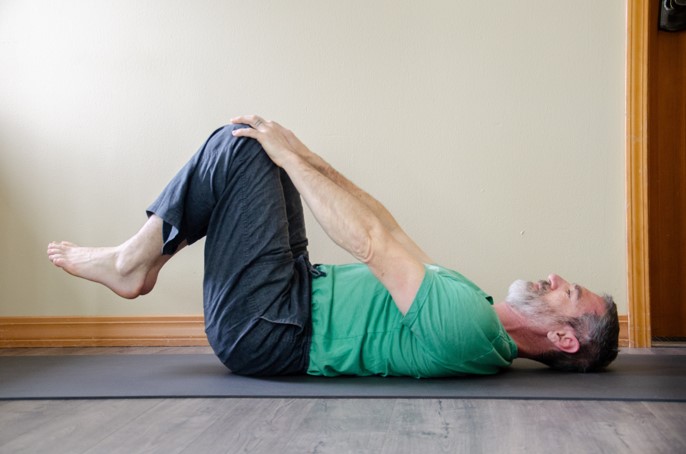
A release activity that I commonly recommend is knee to chest motion. You may choose to bring knees into the chest and rock a bit form side to side to release tension. Or, you could attend to the Belly Breathing Breath. On exhale draw the knees / thighs in to you chest, maybe compressing the belly a bit; and then, on inhale let the knees / thighs come away from you belly / chest just as far as your arms are long. Allow this bit of hip motion to release some of the hip and gluteal tension.
HIP STRENGTHENING STRETCHES
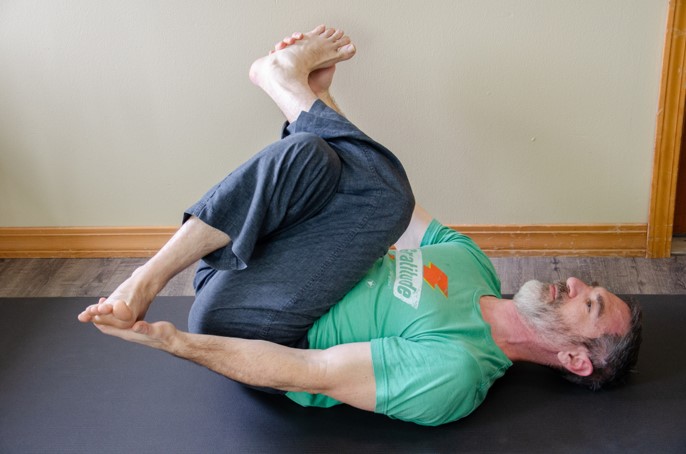
Next you will want to stretch the activated muscles. A figure 4 stretch is ok for getting at those muscles but I really like the cross leg stretch where we grab hold of opposite feet, ankles, shins, or maybe just the knees depending on our range of motion.
If you have to lift your head to grab the feet, ankles, shins or knees (most of us do), see if you can lengthen the back of your neck as you relax back down so that your spine is long as you ease into this stretch. Maybe explore the experience of making circles in space with your knees in this position. Maybe stick with belly breathing in this stretch: On Exhale, pull your feet in toward the armpits deepening the stretch, compressing the belly. On inhale soften the tension on the stretch and allow the belly to expand.
Switch the leg that is on top so that you get stretch on both sides.

